
TL;DR
Placing a rig in a closet can drastically cut noise, but it needs proper ventilation and strategic treatment. Distance and sealing gaps matter more than foam. Use layered solutions for best results.
Ever notice how a tiny room like a closet can turn your voice into a muddy echo chamber? Or how a loud rig seems to fill your entire apartment? The secret isn’t just foam or thick panels—it’s where you put your gear and how you treat the space around it.
If you’re tired of noise leaks or harsh reflections, this guide will show you real-world strategies to make your small setup quieter, cleaner, and more professional—without breaking the bank. For detailed tips on acoustic treatment, see Acoustic Dampening, Placement, and the “Rig in the Closet” Setup.
Acoustic dampening
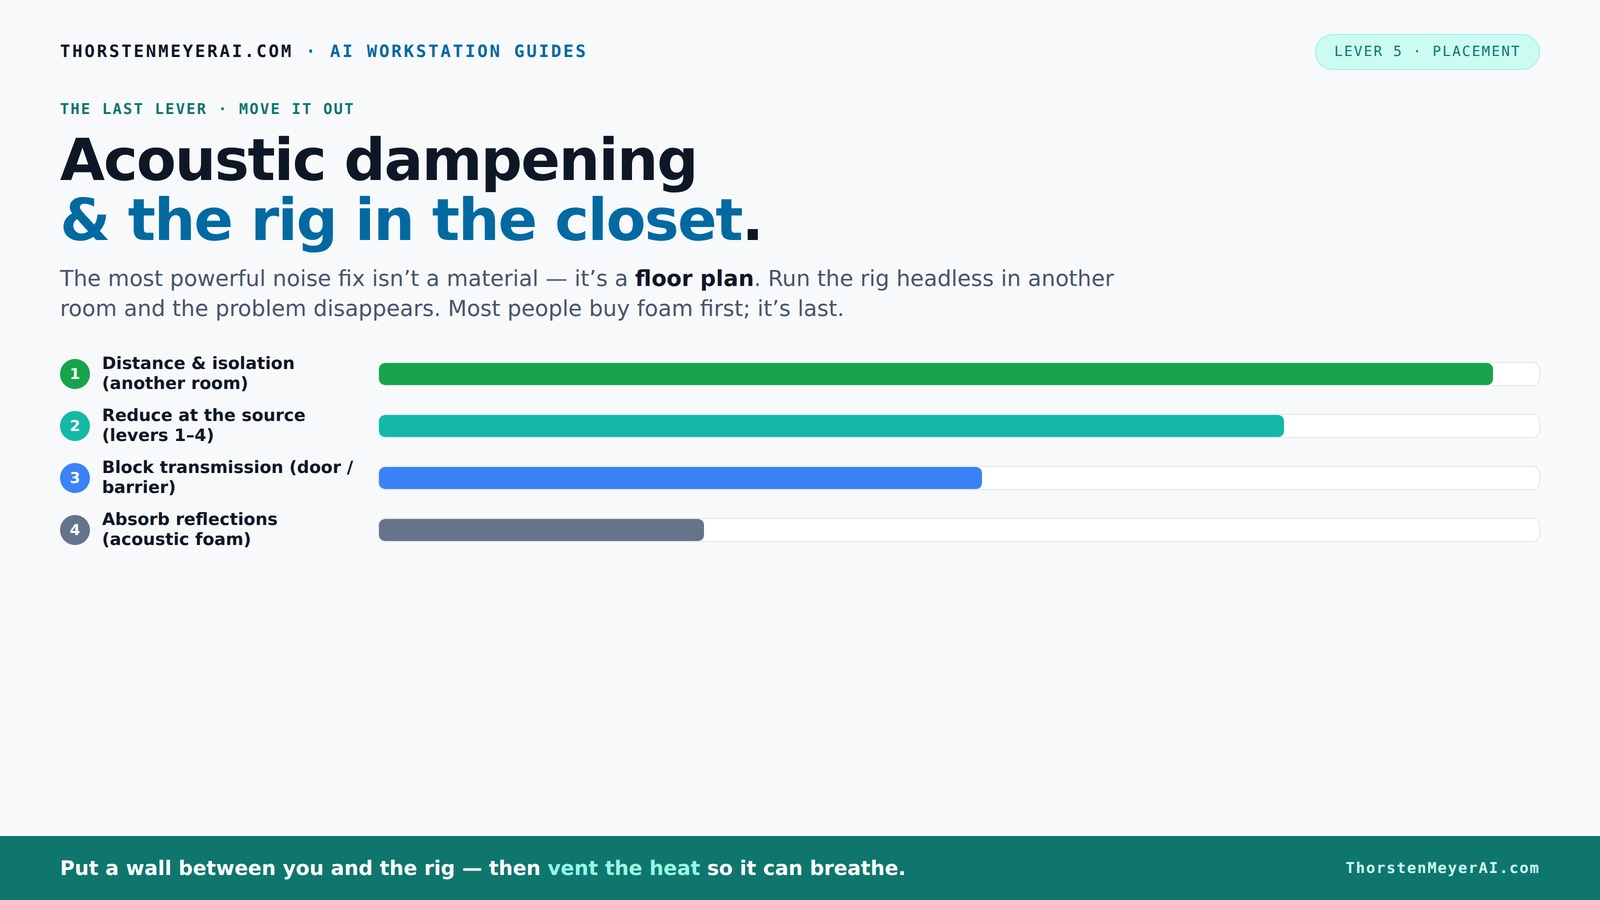
& the rig in the closet.
The most powerful noise fix isn’t a material — it’s a floor plan. A rig you can’t hear because it’s in another room beats any amount of foam. Tap the approaches in Part 1 to see what actually works.
(another room)
(levers 1–4)
(door / barrier)
(acoustic foam)
Contain the noise, not the heat
Key Takeaways
- Moving your rig into another room or closet dramatically reduces noise, often more than any foam or paneling.
- Proper ventilation is critical—sealed closets trap heat, which can damage hardware; always include airflow solutions.
- Focus on sealing gaps around doors and cracks first. Soundproofing small leaks cuts noise more than just adding foam.
- Place absorption at reflection points—behind the mic, side walls, and ceiling—to tame harsh reflections in tiny rooms.
- Layer blankets, foam, and sealant for a DIY solution that balances cost, ease, and effectiveness.

Focusound 52 Pack Acoustic Foam Panels 1" x 12" x 12" Sound Proof Foam Panles Soundproofing Noise Cancelling Wedge Panels for Home Office Recoding Studio with 300PCS Double-Side Adhesive
Soundproofing - Acoustic foam panels triangular grooves structure for better noise absorption, helps to reduce and absorb unwanted...
As an affiliate, we earn on qualifying purchases.
As an affiliate, we earn on qualifying purchases.
Why Distance Beats Foam Every Time
Distance is your best friend when it comes to noise reduction. The farther your rig is from you, the less you hear. Think of it like a river: the further the sound has to travel, the weaker it becomes. Moving your rig into another room, like a closet or basement, cuts noise dramatically.
For example, if your computer is on your desk, every fan noise and coil hum radiates directly into your ears. But if you put it in a closet on the other side of the house, that noise is more or less gone—just like magic.
This is especially true for AI workstations — since you mostly access them via network, you don’t need to sit next to the machine. A wired Ethernet connection keeps communication fast, while the sound stays in the closet.

8 Pack - Bass Traps Acoustic Foam Corner, 8''x8''x12'' Black Bass Traps Corner Studio Foam, High Density and Fire-Proof Acoustic Panels Recording Studio Acoustical Treatments
Acoustic Principle- Bass Trap is a kind of sound absorbing structure specially used to absorb specific low-frequency standing...
As an affiliate, we earn on qualifying purchases.
As an affiliate, we earn on qualifying purchases.
The 'Rig in the Closet' Setup: How to Do It Right
Putting a hot, noisy machine in a closet is a game-changer—but only if you handle the heat. Sealing the space completely traps heat, cooking your hardware. Instead, you need active ventilation: a quiet exhaust fan, vents, or even ducting to move hot air out. For more on cooling solutions, check this guide on reducing heat and noise in AI workstations.
In practice, a small, well-ventilated closet with a fan pushing hot air out can keep your rig cool. You can even install a simple duct system connected to a regular fan or use a purpose-built soundproof cabinet designed for cooling.
For detailed setups and cooling options, check this guide on [how to reduce heat and noise in a high-power AI workstation](https://thorstenmeyerai.com/reduce-heat-noise-ai-workstation/). Proper airflow is critical to prevent throttling and overheating, which defeats the whole purpose.

Audimute Soundproofing Acoustic Door Seal Kit - Door Sweep and Seal - (Standard Size)
Includes a Door Seal (3/16" x 1/2" x 25') and a Door Sweep (1/2" x 1.5" x 4').
As an affiliate, we earn on qualifying purchases.
As an affiliate, we earn on qualifying purchases.
Acoustic Treatment vs. Soundproofing: What Really Matters
Many assume foam or blankets will fully soundproof their closet. Not quite. Acoustic dampening reduces reflections inside, making your recordings clearer. Soundproofing stops sound from leaking out or in. The key is knowing what you need. To learn more about effective acoustic treatment, visit this guide on acoustic dampening and placement.
For example, a blanket draped over the door cuts down on reflections bouncing inside, but it won’t stop noise from escaping into your apartment. To block leaks, you need seals, gaskets, or even a barrier like a solid door or panel.
Soundproofing is about sealing gaps and adding mass, while dampening is about softening reflections. Both matter, but your first move should be sealing leaks around the door and cracks.

TroyStudio Portable Vocal Booth, Large Foldable Microphone Isolation Shield, Music Recording Studio Sound Echo Absorbing Box, Desk & Stand Use Reflection Filter with Thickened Dense Acoustic Foam
【BASIC INFO】: Inside size after setup: 8'' (L) X 10'' (W) X 12'' (H), large space for various...
As an affiliate, we earn on qualifying purchases.
As an affiliate, we earn on qualifying purchases.
Where to Place Absorption for Max Effect in a Tiny Room
Placement is king. Acoustic dampening works best when you target the first reflection points—where sound bounces off surfaces and hits the mic or your ears. For tips on optimal placement, see this article on acoustic treatment placement.
For a closet, start with the wall behind your microphone. It’s the first reflection point and often neglected. Next, treat side walls and even the ceiling, since in tight spaces sound ricochets quickly.
For example, hang a thick panel or blanket directly behind your mic. Use a mirror trick: hold a small mirror at reflection points while speaking to see where the sound bounces most.
Floor coverage helps, too—layering rugs or carpets reduces harshness and flutter echoes.
The Secrets of Covering Your Closet: How Much Is Enough?
How much coverage do you need? In small spaces, about 20-30% of wall surface with absorptive material can significantly cut down on echo. But don’t just focus on corners—treat reflection points on walls and ceiling.
For example, in a 4x4 foot closet, hanging 2-inch thick foam panels on the wall behind your mic, plus a few on the side walls and ceiling, can make a big difference. Use blankets or DIY panels for a budget-friendly approach.
Layering materials—foam, blankets, rugs—creates a more balanced absorption, especially at low frequencies, which are harder to tame.
How to Seal Gaps and Stop Sound Leaks Through the Door
Gaps around the closet door are the biggest leaks. Sealing cracks with weatherstripping or acoustic sealant can drastically reduce sound escape. For more detailed sealing techniques, see this guide on sealing gaps and sound leaks.
In practice, place a thick blanket or moving pad over the door and seal edges with weatherstripping or draft stoppers. For serious isolation, install a solid door or a soundproof barrier panel.
Remember, even tiny cracks matter. Use foam tape or sealant on all gaps for a tight seal.
Bass Traps and Low-End Control in Small Spaces
Small rooms like closets tend to amplify low frequencies, making recordings boomy or muddy. Bass traps or thicker absorption panels—4 inches or more—are often necessary. For more on controlling low-end in small spaces, see this article on bass traps and low-frequency control.
For example, placing a bass trap in the corner behind your mic or along the wall can tame these resonances. If space is tight, DIY bass traps with rockwool or Owens Corning panels work well.
Research shows that 4-inch thick traps are more effective at low frequencies than standard 2-inch panels, especially in small, reflective rooms.
Layered Materials: The Best DIY Solution for Small Spaces
Combining blankets, foam, panels, and sealant creates a layered shield against sound. For example, draping a thick blanket over the wall, adding foam panels at reflection points, and sealing gaps around the door yields a surprisingly quiet setup.
This approach balances affordability and effectiveness. Layering also helps tame low frequencies better than a single material alone.
Many creators use layered blankets and foam for temporary or semi-permanent booths, often leaving a small air gap for better absorption.
Frequently Asked Questions
Is acoustic foam enough for a closet studio?
Not entirely. Foam reduces reflections and echo but won't block sound leaks. For best results, combine foam with sealing gaps and strategic placement of absorption materials.
Where should I place panels or blankets in a closet booth?
Start with the wall behind your microphone. Then treat side walls, the ceiling, and even the floor with rugs or blankets. Reflection points are your priority.
How do I prevent sound leaking through the closet door?
Seal gaps with weatherstripping, add a thick blanket or moving pad over the door, and consider installing a solid or soundproof door for serious isolation.
Should I add bass traps in such a small room?
Yes. Bass buildup in small, reflective spaces can muddy recordings. Use DIY or commercial bass traps in corners to tame low frequencies effectively.
Can a closet really work as a vocal booth?
Absolutely, with proper treatment and ventilation. Focus on reflection control, sealing leaks, and making sure it stays cool. Many creators swear by their closet setups for quality recordings.
Conclusion
In tiny spaces, the secret isn’t just about stuffing foam everywhere—it's where you put your gear, how well you seal gaps, and how you handle heat. Moving a rig into a closet or another room often makes the biggest difference, with proper ventilation and strategic treatment following close behind.
Remember: sound leaks through gaps and reflections, not just in the air but through solid surfaces. Master those, and your closet studio won’t just be quiet—it’ll be professional-grade.