This guide helps you choose, place, and prepare a compact air fryer for a small kitchen. You will measure the available space, compare appliance dimensions and cooking capacity, check ventilation and electrical needs, then set up the fryer safely. It is for first-time buyers and anyone replacing a bulky countertop appliance. Allow 30-60 minutes to compare options, plus 10-20 minutes to unpack and prepare your chosen model.

Get kitchen gear delivered free with Prime
- Fast, free delivery on millions of items
- Prime Video, Amazon Music and more included
- Member-only deals all year
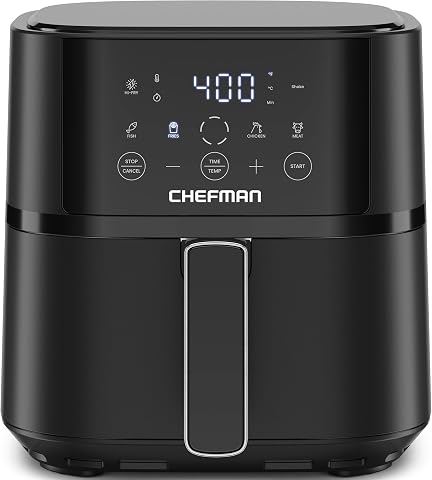
Chefman Air Fryer – 4 QT Compact Airfryer with Hi-Fry Technology, Touchscreen Controls, and Dishwasher Safe Basket
- ✔ Capacity: 4 quarts
- ✔ Power: 1500 W
- ✔ Controls: Touchscreen

bella Fits-anywhere™ Slim 4qt Air Fryer, Non-Toxic Ceramic Coating, Oatmilk
- ✔ Capacity: 4 quarts
- ✔ Food capacity: 3.3 lb
- ✔ Power: 1300 W

Chefman 2 Qt Mini Air Fryer with Digital Touch Screen, Nonstick Dishwasher Safe Basket, and Shake Reminder
- ✔ Capacity: 2 quarts
- ✔ Dimensions: 10 x 10 x 8.3 in
- ✔ Weight: 5.9 lb
Difficulty: Beginner | Time: 30-60 minutes to compare models and measure; 10-20 minutes to set up
What You’ll Need
Tools & Materials:
- Tape measure or ruler
- Phone or notepad for recording measurements and model details
- Access to the appliance’s manual or manufacturer specifications
- Clear countertop space near a suitable electrical outlet
Knowledge:
- Basic familiarity with your kitchen layout and the foods you plan to cook
- Ability to check the rating label or specifications for an appliance’s power requirements
Decide whether you want a basket-style fryer or a small oven-style model before comparing products. Basket models often use less counter space, while oven-style models may offer racks but need more clearance. Do not buy based on the advertised capacity alone: appliance width, depth, height, handle projection, and clearance around hot air outlets affect where it can go.
Chefman Air Fryer – 4 QT Compact Airfryer with Hi-Fry Technology, Touchscreen Controls, and Dishwasher Safe Basket
For many small kitchens, 4 quarts is the useful middle ground: it offers more flexibility than a mini basket without stepping up to an appliance described as large. This Chefman is our best overall because its touchscreen presets and Hi-Fry technology add everyday convenience without making the case for a much bigger capacity. It is listed for meals for two to four people, a broader use range than the 2-quart Mini, which is specifically suited to one or two.The practical distinction from bella is in the cooking setup. Chefman provides four presets and calls out Hi-Fry for extra-crispy results; bella offers six presets and a slim design, with ceramic coating as its standout. Neither has a stated dimension in the supplied specifications, so we cannot claim this Chefman is narrower or easier to fit than bella. We give it the top spot for its combination of capacity, controls, and dishwasher-safe basket, rather than a proven footprint advantage.There are real limits. The 4-quart basket may still mean cooking in batches for larger households, and there are no included accessories or extra racks to expand how you use the space. Touch controls will also be less appealing to anyone who prefers straightforward manual dials. Compared with the Mini, this model takes the more versatile route; compared with bella, it prioritizes Hi-Fry and a simpler four-preset setup over the slim-profile and ceramic-coating emphasis.
Pros:
- 4-quart capacity is more flexible than the 2-quart Mini for shared meals
- Hi-Fry technology is designed for extra-crispy results
- Four touchscreen presets simplify common cooking tasks
- Dishwasher-safe nonstick basket supports easier cleanup
Cons:
- The 4-quart capacity may require batches for larger households
- No accessories or additional racks are included
- Touchscreen controls may not suit buyers who prefer manual dials
Best for: Couples or small households that want a versatile 4-quart air fryer with touchscreen presets and a dishwasher-safe basket.
Not ideal for: Buyers who need a verified narrow footprint, prefer manual controls, or regularly cook large family-sized batches.
Bottom line: We recommend this Chefman as the strongest all-rounder when a small kitchen needs more than a single-serving air fryer but not a large-capacity appliance.
“We recommend this Chefman as the strongest all-rounder when a small kitchen needs more than a single-serving air fryer but not a large-capacity appliance.”
bella Fits-anywhere™ Slim 4qt Air Fryer, Non-Toxic Ceramic Coating, Oatmilk
If a counter is narrow rather than simply short on storage, bella’s slim-profile design makes this 4-quart model the most targeted choice in the lineup. Its capacity is the same as the larger Chefman, but bella specifically emphasizes a space-saving shape and lists a food capacity of 3.3 pounds. That combination may suit buyers who want to cook for more than one person while avoiding the 2-quart Mini’s smaller-batch routine.bella also differentiates itself through its EverGood ceramic nonstick coating and six digital presets. Compared with the Chefman 4 QT, it offers two additional presets and a ceramic coating rather than the Chefman’s Hi-Fry feature. Those are different kinds of convenience: bella leans toward cooking modes and coating, while Chefman highlights extra-crispy cooking. The supplied details do not include bella’s dimensions, so we should treat “slim” as its design positioning, not assume a specific clearance or exact amount of counter saved.Its 4-quart capacity is still a limit if you routinely prepare large batches, and the product details do not mention smart connectivity—something that matters only if connected controls are a priority. The slim shape may also be awkward for a storage spot with limited depth or height; a narrow appliance is not automatically easy to put away. Compared with the Chefman Mini, bella occupies a larger capacity class. Choose it when the 4-quart volume is useful and the design emphasis fits your counter, not when the smallest possible appliance is the goal.
Pros:
- Slim design is specifically intended to save kitchen space
- 4-quart capacity and stated 3.3-pound food capacity suit shared meals
- Ceramic nonstick coating is the key alternative to the Chefman basket coatings
- Six digital presets provide more listed cooking modes than either Chefman model
Cons:
- The supplied specifications do not provide dimensions for fit-checking
- 4-quart capacity may not be enough for large batches
- Smart connectivity is not listed
Best for: Small households that want 4-quart capacity, a slim-profile design, ceramic nonstick coating, and several digital presets.
Not ideal for: Buyers who need exact published dimensions before confirming a tight fit, want a truly mini appliance, or cook large batches regularly.
Bottom line: We would choose bella over the standard 4-quart Chefman when its slim-profile design and ceramic coating matter more than Hi-Fry technology.
“We would choose bella over the standard 4-quart Chefman when its slim-profile design and ceramic coating matter more than Hi-Fry technology.”
Chefman 2 Qt Mini Air Fryer with Digital Touch Screen, Nonstick Dishwasher Safe Basket, and Shake Reminder
This is the clear pick when minimum appliance size matters more than cooking volume. At 10 x 10 x 8.3 inches and 5.9 pounds, the Chefman Mini has the most concrete fit information in this comparison and is designed to fit on a countertop or in a cabinet. Its 2-quart capacity is best understood as a single-serving or small-household tool, not a smaller version of the 4-quart models for the same workload.The Mini’s shake reminder is a useful prompt for turning or shaking food during cooking, while the adjustable temperature reaches 400°F. Its dishwasher-safe nonstick basket keeps cleanup straightforward, and the touch screen gives it a more digital feel than a simple dial-based compact appliance. It is also the lowest-wattage model in this lineup at 900 watts, compared with 1300 watts for bella and 1500 watts for the 4-quart Chefman; wattage alone does not establish cooking speed or performance, so we treat it as a specification rather than a promise.The cost of the smaller footprint is more limited batch size. Buyers cooking for several people may need repeated rounds, whereas either 4-quart option provides more room for shared meals. The product information also notes plastic in its materials, which may be a concern for buyers who prefer a more metal-forward construction. We rank it third overall because it solves a narrower problem than the others, but for a solo cook, occasional use, or a kitchen where the appliance must be easy to put away, its smaller dimensions are a genuine advantage rather than a compromise to overlook.
Pros:
- Listed 10 x 10 x 8.3-inch dimensions make fit planning more straightforward
- 2-quart size is easier to move and store than either 4-quart option
- Shake reminder helps prompt more even handling during cooking
- Dishwasher-safe nonstick basket supports convenient cleanup
Cons:
- 2-quart capacity is limited to small servings and may require multiple batches
- Plastic is among the listed materials, which may not suit buyers seeking a more metal-forward build
- Less versatile for shared meals than the two 4-quart models
Best for: One or two people with very limited counter or cabinet space who value listed dimensions, easy storage, and a shake reminder.
Not ideal for: Families, frequent batch cooks, or anyone who wants the broader meal capacity of the two 4-quart models.
Bottom line: We recommend the Mini only when a small footprint and easy storage outweigh the convenience of cooking larger portions at once.
“We recommend the Mini only when a small footprint and easy storage outweigh the convenience of cooking larger portions at once.”
As an Amazon Associate we earn from qualifying purchases.
Before You Start
Check the model’s manual for required side, rear, and overhead clearance before selecting a permanent location. Air fryers release hot air and can heat nearby surfaces. Do not plan to operate one inside a closed cupboard, beneath a low shelf that the manual rules out, or beside items that can melt or catch fire. Use a sound, level, heat-resistant countertop, and connect the fryer directly to a suitable wall outlet unless the manufacturer explicitly permits another arrangement.
Measure the space with doors, drawers, and nearby appliances in their usual positions. Include room to pull out the basket fully, lift the lid if applicable, and move the fryer safely when it is cool.
Step-by-Step Instructions
Step 1: List what you plan to cook
Write down the meals you expect to make most often and the number of people you usually cook for. Include common portions such as a serving of fries, vegetables, fish fillets, or chicken pieces. If you cook for one or two people, a smaller basket may suit routine meals; if you want to cook several portions at once, compare larger baskets or models with more usable cooking area.
Check the shape of the food as well as the quantity. A basket that holds enough by volume may still be too narrow for a whole piece of fish or too shallow for foods that need to sit in a single layer. Use the product’s interior dimensions or basket measurements when available.
Tip: Capacity labels vary between brands. Use cooking-area dimensions and the stated serving guidance rather than assuming that two models with the same litre rating hold food equally well.
Check: You have a short list of typical foods, portion sizes, and any unusually large items the fryer must fit.
Step 2: Measure the available countertop space
Measure the width, depth, and height of the intended spot. Record the measurements, then compare them with the full external dimensions in each model’s specifications. Add the handle and controls to the depth measurement if they project beyond the body. Leave enough space to pull the basket or tray out without hitting a wall, cabinet, or another appliance.
Check the clearance requirements in the manual or manufacturer listing. Reserve that space around the appliance, including above it, rather than filling the gap with containers or kitchen items. If you intend to store the fryer in a cupboard between uses, measure the opening and confirm that the cooled appliance can be lifted in and out safely.
Tip: Do not estimate by comparing product photos with your counter. Photograph perspective and missing handles can make a fryer appear smaller than it is.
Check: You have recorded the usable counter area and can name models whose full dimensions and required clearances fit it.
Step 3: Check the outlet and power requirements
Read the appliance specifications for its voltage, wattage, plug type, and any circuit guidance. Confirm that the rating matches the electrical supply where you live and that the intended outlet is accessible without stretching the cord across a walkway, sink, or hot surface. Keep the plug reachable so you can disconnect the fryer after use.
Choose a location near a suitable wall outlet. Avoid relying on an extension lead or multi-outlet adapter; high-power cooking appliances can overload unsuitable equipment. If the outlet is loose, damaged, or becomes hot during use, do not operate the fryer there. Ask a qualified electrician to check it.
Tip: A compact body does not always mean low power consumption. Compare the stated wattage and check your kitchen’s electrical setup before buying.
Check: The chosen model’s electrical rating suits your supply, and its cord reaches a suitable outlet without creating a hazard.
Step 4: Compare compact models against your needs
Shortlist models that fit your measurements and cooking portions. Compare usable basket or tray area, controls, temperature range, timer, cleaning instructions, warranty, and the space needed to open or remove parts. Favor a removable, dishwasher-safe basket only if its size fits your sink or dishwasher and the manufacturer permits dishwasher cleaning.
Compare the complete footprint, not just the body width. A flip-up design may save storage space but still needs overhead clearance when open. A model with two drawers can cook different foods separately but may be wider and harder to fit on a narrow counter. Select the smallest model that comfortably handles your usual food portions rather than choosing the smallest advertised capacity by default.
Tip: Verify dimensions and cleaning directions on the manufacturer’s own product page or manual; retailer listings can omit clearance or accessory details.
Check: You have selected a model that fits the space, handles your normal portions, and can be cleaned and stored as planned.
Step 5: Set up the fryer in a safe location
Place the unplugged fryer on a level, stable, heat-resistant surface and position it according to the manual’s clearance instructions. Keep curtains, paper towels, plastic containers, and other heat-sensitive items away from the air outlet. Make sure the basket can slide out fully and that hot parts will not be reached by children or pets.
Route the cord so it does not hang over the counter edge or touch the appliance’s hot surfaces. Do not place the fryer on a stovetop, even when the burners are off. If the counter spot does not provide the required clearance, choose another location rather than operating the fryer in a cramped space.
Tip: Keep the fryer in its operating position while hot. Move or store it only after it has cooled, and follow the manual’s instructions for handling it.
Check: The appliance is stable, the controls and basket are accessible, the cord is safely routed, and all required clearances are open.
Step 6: Wash removable parts and prepare the unit
Unpack the fryer and remove packaging, labels, and any protective inserts from the cooking area. Check the manual to identify parts that can be washed. Clean the basket, crisper plate, tray, or racks as directed, then dry them fully before fitting them back into the appliance. Wipe the exterior and interior with a soft damp cloth if the manual allows it; do not immerse the main unit or place water inside its electrical housing.
Inspect the cord, plug, and appliance for damage. If anything is cracked, bent, or frayed, leave it unplugged and contact the seller or manufacturer. Follow the manual for any first-use heating or odor-removal procedure, using an empty unit only if the manufacturer specifies that step.
Tip: Avoid abrasive pads and sprays unless the manual approves them; they can damage a nonstick coating or enter electrical openings.
Check: The fryer is undamaged, removable parts are clean and dry, and the unit is assembled as shown in its manual.
Step 7: Test the controls before cooking a meal
Plug the fryer directly into the suitable outlet and follow the manual’s first-use instructions. Learn how to set the temperature and timer, pause or stop a cycle, remove the basket, and reinsert it. If the manual recommends an empty test run, perform it with the required ventilation and keep hands away from the exhaust.
For your first food, choose a small, familiar portion and follow a recipe or the appliance’s cooking chart. Leave room for hot air to circulate, and shake or turn food only when the recipe or manual calls for it. Use oven mitts or heat-safe tools when handling hot parts, and place the basket on a heat-resistant surface.
Tip: Do not fill the basket to the rim. Crowding blocks airflow and can leave food unevenly cooked; cook in batches when needed.
Check: The controls respond, the fryer completes the specified test or cooking cycle without an electrical fault, and food is cooked evenly enough for the intended recipe.
Common Mistakes to Avoid
- Buying a model based only on its advertised capacity or small-looking product photo. — Compare external dimensions, handle projection, usable cooking area, and required operating clearance against your own measurements.
- Placing the fryer beneath a shelf or inside a cupboard while it is running. — Use the clearance stated in the manual and operate the fryer in an open, well-ventilated spot. Store it only when cool.
- Overfilling a compact basket to avoid cooking a second batch. — Keep food in a loose, even layer when the recipe calls for it. Cook separate batches if air cannot circulate around the food.
- Washing or immersing the main appliance body. — Wash only the parts identified as removable and washable. Clean the body with the method in the manual and keep water away from electrical openings.
Troubleshooting
Problem: The fryer fits on the counter but the basket will not pull out fully.
Solution: Unplug the cooled unit and move it to a spot with enough forward clearance. Recheck the handle projection and drawer or cabinet interference before choosing a permanent location.
Problem: Food cooks unevenly or stays soft.
Solution: Reduce the amount in the basket, arrange food in a less crowded layer, and shake or turn it when the recipe recommends. Confirm that the temperature and time match the recipe and that the air outlet is not blocked.
Problem: The fryer produces smoke during cooking.
Solution: Stop the cycle if smoke is heavy, unplug the unit when safe, and let it cool. Check the manual, remove accumulated grease from washable parts, and avoid cooking fatty food in a way that lets grease collect near the heating element. If smoke continues with a clean unit or there is a burning electrical smell, stop using it and contact the manufacturer.
Problem: The plug, cord, or outlet becomes unusually hot, or the fryer loses power.
Solution: Stop cooking and unplug the appliance if you can do so safely. Do not use a damaged or loose outlet, extension lead, or adapter. Have the outlet checked by a qualified electrician; contact the manufacturer if the appliance or cord appears faulty.
What Success Looks Like
You have chosen a fryer whose full footprint and operating clearances fit your kitchen, whose basket can handle the portions you actually cook, and whose electrical rating matches your supply. The unit sits on a stable, heat-resistant surface with an accessible outlet and unobstructed air outlets. Removable parts are clean and correctly fitted, the controls work, and a first small batch cooks without crowding or electrical problems.
Next Steps
Let the fryer cool before cleaning or storing it. Wash removable parts according to the manual, wipe away grease after use, and check that the air outlet and heating area remain clear. If you store the unit in a cupboard, lift it only when cool and dry. Keep the manual and warranty details where you can find them, and repeat the setup checks if you move the fryer to another counter spot.
Frequently Asked Questions
What size air fryer works for a small kitchen?
Choose by both available counter space and the portions you cook. A smaller basket-style unit may suit one or two people, but verify the basket’s usable area and the manufacturer’s serving guidance. Measure the complete appliance, including handles, and leave the specified clearance for operation.
Can I run a compact air fryer under a kitchen cabinet?
Only if the manual permits that placement and the required overhead clearance is available. Air fryers release hot air, so a low cabinet can be exposed to heat. If the required clearance is not available, move the fryer to an open counter area while it operates.
Can I use an extension cord with an air fryer?
Use a suitable wall outlet directly unless the manufacturer explicitly allows an extension cord. Air fryers can draw substantial power, and an unsuitable cord or adapter can overheat. Ask an electrician to review the outlet if it is not close enough.
Do compact air fryers need to be preheated?
Follow the manual and recipe. Some recipes call for preheating, while some appliances do not require it. Do not add an empty preheating step if the manufacturer advises against it.
How can I tell if a compact model is too small?
If your usual food portions cannot fit without piling or crowding, the cooking area may be too small for your routine. Compare interior measurements with the foods you cook, and decide whether cooking in batches is acceptable before buying.